Creating a custom WordPress plugin can offer numerous benefits for website owners and developers alike. WordPress, being one of the most popular content management systems (CMS) in the world, provides a robust and flexible platform for building websites. However, the true power of WordPress lies in its extensibility through plugins. By creating a custom plugin tailored to specific needs, users can unlock several advantages. Let’s explore some of the key benefits of developing a custom WordPress plugin:
- Tailored Functionality: Custom plugins allow you to add specific features and functionality to your website that are not available in off-the-shelf solutions. Whether it’s a complex e-commerce integration, a unique content management system, or a specialized form builder, a custom plugin can be developed to address your precise requirements. This level of customization ensures that your website operates exactly as you envision, providing a seamless user experience.
- Improved Performance: Custom plugins are designed specifically for your website, which means they can be optimized for performance. By avoiding unnecessary features and code bloat, you can create a lean and efficient plugin that enhances your website’s speed and overall performance. This is particularly crucial for high-traffic websites or those with unique resource requirements.
- Enhanced Security: WordPress’s popularity makes it a prime target for hackers and malicious attacks. By creating a custom plugin, you have greater control over your website’s security. You can implement specific security measures, such as user authentication, data encryption, and access controls, to safeguard your website and its data. Additionally, custom plugins reduce the reliance on third-party plugins, minimizing the risk of vulnerabilities associated with outdated or poorly maintained plugins.
- Seamless Integration: Integrating third-party tools and services into a WordPress website often requires plugins. However, relying solely on existing plugins may lead to compatibility issues or limited functionality. With a custom plugin, you can seamlessly integrate external systems, APIs, or services that are critical to your website’s operation. This allows for a more efficient workflow, improved data synchronization, and the ability to automate various processes.
- Scalability and Flexibility: As your website evolves and grows, your requirements may change. Off-the-shelf plugins may not always keep up with your expanding needs. With a custom plugin, you have the freedom to modify and extend its functionality as your business or website demands. This scalability and flexibility ensure that your website can adapt to new challenges and opportunities without being constrained by the limitations of pre-built plugins.
- Competitive Advantage: In today’s digital landscape, standing out from the crowd is essential. A custom WordPress plugin can give you a competitive edge by offering unique features, functionalities, and user experiences that are not readily available to your competitors. It allows you to differentiate your website and provide a tailored solution that aligns perfectly with your brand, audience, and business objectives.
- Ownership and Control: By creating a custom plugin, you retain complete ownership and control over its development, maintenance, and updates. You are not dependent on external plugin developers, their release schedules, or their commitment to ongoing support. This level of control ensures that your website remains functional, up-to-date, and secure over the long term.
While creating a custom WordPress plugin requires technical expertise and investment, the benefits it offers can outweigh the initial challenges. By harnessing the power of customization, you can elevate your website’s functionality, security, and performance, setting yourself apart in the competitive online landscape.
Getting Started with Plugin Development
Getting started with WordPress plugin development can be an exciting journey that allows you to extend the functionality of your website or contribute to the vibrant WordPress community. Whether you’re a seasoned developer or just starting out, here are some essential steps to help you embark on your WordPress plugin development adventure:
- Set Up a Local Development Environment: To begin, set up a local development environment on your computer. This allows you to build and test your plugin without affecting your live website. Install a local server environment like XAMPP, WAMP, or MAMP, which includes Apache, MySQL, and PHP.
- Familiarize Yourself with WordPress: Before diving into plugin development, it’s crucial to have a good understanding of how WordPress works. Familiarize yourself with the WordPress Codex, which serves as the official documentation for WordPress. Explore the structure of a WordPress theme and the basics of plugin development to grasp the underlying concepts.
- Create a Plugin Directory: Within the WordPress installation, navigate to the ‘wp-content/plugins’ directory and create a new folder for your plugin. Choose a unique and descriptive name for your plugin directory to avoid conflicts with existing plugins.
- Set Up the Main Plugin File: Inside your plugin directory, create a main PHP file that serves as the entry point for your plugin. Typically, this file has the same name as your plugin directory and ends with the ‘.php’ extension. Within this file, you’ll define essential information about your plugin, such as the plugin name, version, author, and a brief description.
- Activate Your Plugin: Log in to your WordPress admin dashboard and navigate to the ‘Plugins’ section. You should see your plugin listed, but it will be inactive by default. Click on the ‘Activate’ button to activate your plugin and make it available for use on your website.
- Start Writing Plugin Code: Now that your plugin is set up, you can start writing code to add functionality. Use hooks and filters provided by WordPress to integrate your code into the core system. Hooks allow you to execute your code at specific points during the WordPress execution process, while filters modify data before it is displayed.
- Test and Debug Your Plugin: Testing is a critical part of the plugin development process. Use tools like the WordPress Plugin Test Drive, Theme Check, or the WordPress Debugging plugin to ensure your plugin functions correctly and adheres to WordPress coding standards. Debug any issues you encounter to identify and fix errors or conflicts.
- Document Your Plugin: Documenting your plugin is essential for both yourself and potential users. Add inline comments to your code, providing explanations for complex functions or logic. Create a readme.txt file in your plugin directory that describes the plugin’s purpose, features, installation instructions, and frequently asked questions.
- Publish Your Plugin: Once your plugin is tested, debugged, and documented, you can consider publishing it on the official WordPress Plugin Repository or any other suitable platform. Comply with the guidelines and submission requirements of the respective platform to ensure your plugin meets the necessary standards.
- Maintain and Update Your Plugin: Plugin development is an ongoing process. Continuously monitor your plugin’s performance, user feedback, and compatibility with the latest WordPress versions. Regularly release updates that address bugs, introduce new features, or improve the overall user experience.
Remember, plugin development requires continuous learning and improvement. Stay engaged with the WordPress community, join forums and developer groups, and explore resources such as tutorials, blogs, and online courses to expand your knowledge and stay up to date with best practices.
With dedication and perseverance, you can create powerful and valuable plugins that enhance the functionality and versatility of WordPress websites while contributing to the broader WordPress ecosystem.
Creating the Plugin Header
When developing a WordPress plugin, the plugin header is an essential component that provides important information about the plugin to both WordPress and the users. It is located at the top of the main plugin file and contains metadata that WordPress uses to identify and manage the plugin. Let’s explore the key elements of the WordPress plugin header:
- Plugin Name: The plugin name is the official name of your plugin. It should be unique and descriptive, clearly indicating the purpose or functionality of the plugin.
- Plugin URI: The plugin URI is the URL where users can find more information about your plugin. It could be a dedicated website, a documentation page, or a support forum. This allows users to access additional resources related to your plugin.
- Description: The description provides a brief overview of what the plugin does and its key features. It should be concise yet informative, enticing users to learn more about the plugin and its benefits.
- Version: The version number denotes the current version of the plugin. It is crucial for managing updates and ensuring compatibility with different versions of WordPress. Following a standardized versioning scheme (e.g., Semantic Versioning) helps users understand the significance of each update.
- Author: The author field specifies the name of the plugin’s author or development team. It can be an individual, a company, or a group. This information helps users identify the creators of the plugin.
- Author URI: The author URI is the website URL of the plugin author or development team. It provides a link for users to explore more about the author’s work, portfolio, or contact information.
- License: The license defines the terms under which your plugin is distributed and used. It is essential to choose a suitable open-source license (e.g., GPL) that aligns with WordPress guidelines and promotes collaboration and sharing.
- License URI: The license URI is the URL where the full text of the license is available. This allows users to understand the specific terms and conditions associated with using your plugin.
- Text Domain: The text domain is a unique identifier used for localization and translation purposes. It helps WordPress load the appropriate translation files for internationalization, enabling users to translate the plugin into different languages.
- Domain Path: The domain path specifies the relative path to the plugin’s language files. It is necessary for WordPress to locate and load the translation files correctly.
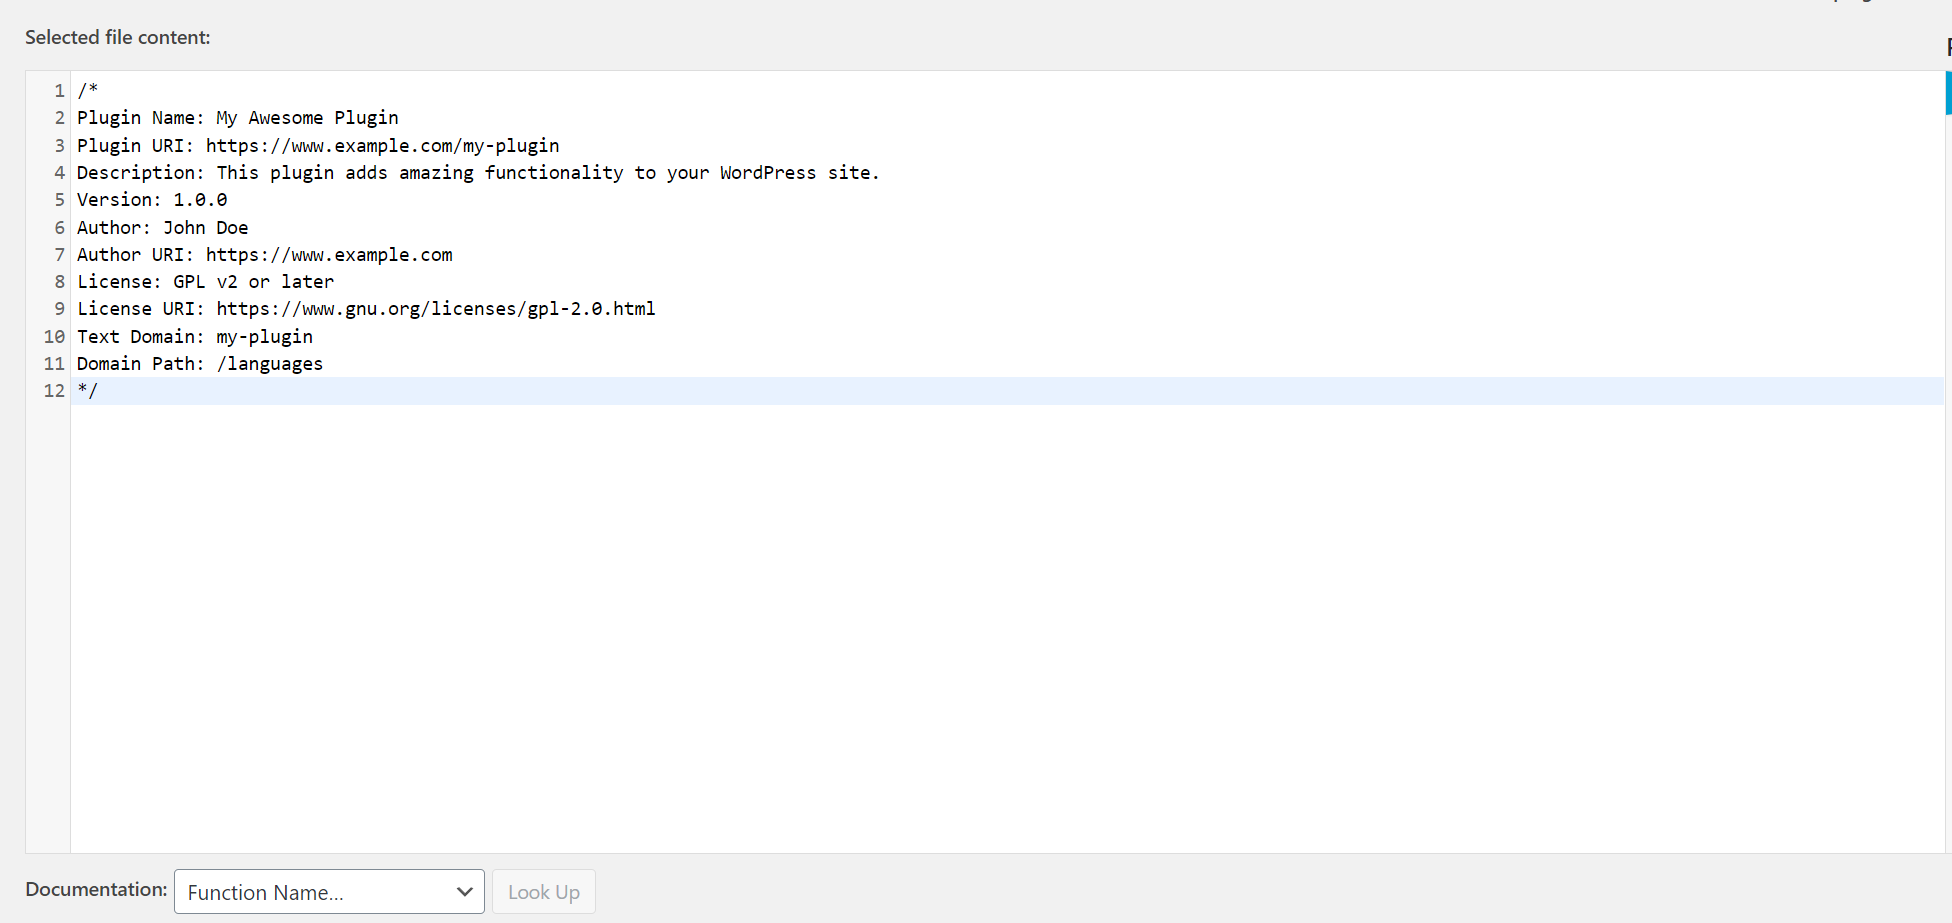
Here’s an example of a typical plugin header in a WordPress plugin file:
/*
Plugin Name: My Awesome Plugin
Plugin URI: https://www.example.com/my-plugin
Description: This plugin adds amazing functionality to your WordPress site.
Version: 1.0.0
Author: John Doe
Author URI: https://www.example.com
License: GPL v2 or later
License URI: https://www.gnu.org/licenses/gpl-2.0.html
Text Domain: my-plugin
Domain Path: /languages
*/
Including a well-formed and accurate plugin header is crucial for a smooth integration of your plugin into the WordPress ecosystem. It ensures compatibility, provides necessary information to users, and allows for efficient management and updates.
Creating the Plugin Activation and Deactivation Hooks
When developing a WordPress plugin, it’s important to incorporate activation and deactivation hooks to perform specific actions when the plugin is activated or deactivated by the user. These hooks allow you to execute code during these events, such as setting up database tables, initializing variables, or cleaning up resources. Let’s explore how to create the activation and deactivation hooks in your WordPress plugin:
- Activation Hook: The activation hook is triggered when the user activates the plugin from the WordPress admin dashboard. It is an opportune moment to perform any necessary setup or initialization tasks. To create an activation hook, you need to follow these steps:
a. Open your main plugin file (typically the one with the .php extension) and locate the plugin header. b. Below the plugin header, add the following code:
register_activation_hook( __FILE__, 'my_plugin_activation_function' );

function my_plugin_activation_function() {
    // Perform activation tasks here
    // Examples: create database tables, set default options, initialize variables
}
In the above code, replace 'my_plugin_activation_function' with the actual name of your activation function. This function will be executed when the plugin is activated.
- Deactivation Hook: The deactivation hook is triggered when the user deactivates the plugin from the WordPress admin dashboard. It allows you to perform any necessary cleanup tasks, such as removing temporary files, deleting database tables, or reverting settings. To create a deactivation hook, follow these steps:
a. Open your main plugin file and locate the plugin header. b. Below the plugin header, add the following code:
register_deactivation_hook( __FILE__, 'my_plugin_deactivation_function' );

function my_plugin_deactivation_function() {
    // Perform deactivation tasks here
    // Examples: delete temporary files, remove database tables, revert settings
}
Again, replace 'my_plugin_deactivation_function' with the actual name of your deactivation function. This function will be executed when the plugin is deactivated.
It’s important to note that the activation and deactivation hooks should be placed in the main plugin file, as they need to be registered when the plugin is loaded.
By utilizing activation and deactivation hooks, you can ensure that your plugin performs necessary tasks during these critical events. This helps maintain the integrity of your plugin’s functionality and provides a smooth experience for users when activating or deactivating the plugin on their WordPress site.
Adding Custom Functionality to Plugin
Adding custom functionality to a WordPress plugin allows you to extend the capabilities of your plugin and tailor it to your specific needs. Whether you’re creating a new plugin or modifying an existing one, here are the key steps to add custom functionality:
- Identify the Purpose: Determine the specific functionality you want to add to your plugin. Whether it’s a new feature, integration with a third-party service, or modifications to existing functionality, having a clear goal in mind is essential.
- Understand the Plugin Structure: Familiarize yourself with the plugin’s structure and codebase. Identify the files and functions relevant to the area where you want to add custom functionality. This understanding will help you integrate your custom code seamlessly.
- Create a Custom Function: Create a new function or set of functions to implement your custom functionality. Depending on the complexity of your task, you may create a single function or a series of interconnected functions. Ideally, encapsulate your custom code within a class or a namespace to avoid conflicts with other plugins or themes.
- Hook into WordPress: Utilize WordPress hooks and filters to integrate your custom code into the WordPress ecosystem. WordPress provides a vast number of action hooks and filter hooks that allow you to execute your code at specific points during the execution process. Identify the appropriate hook that corresponds to the functionality you are adding.
- Add Hooks in Your Plugin: Within your custom function(s), use the
add_action()oradd_filter()functions to attach your custom code to the desired hooks. The first argument of these functions is the hook name, and the second argument is the name of your custom function. This ensures that your custom code is executed when the specified hook is triggered. - Test and Debug: Thoroughly test your custom functionality to ensure it works as intended. Use tools like debuggers, error loggers, and testing environments to identify and fix any issues. Also, consider testing your plugin in various scenarios and configurations to ensure compatibility and stability.
- Document Your Custom Functionality: Document your custom functionality to make it understandable for yourself and others who may work on the plugin in the future. Add comments within your code to explain the purpose, parameters, and expected outcomes of each function. Additionally, update the plugin documentation or readme file to inform users about the added functionality.
- Maintain and Update: Regularly maintain and update your custom functionality as your plugin evolves. Keep an eye on changes in WordPress core functions and APIs that may impact your custom code. Stay active in the WordPress community to learn about best practices and new techniques for enhancing your plugin’s functionality.
Remember to follow WordPress coding standards and guidelines when adding custom functionality. This ensures compatibility, reduces conflicts, and promotes good coding practices.
By adding custom functionality to your WordPress plugin, you can tailor it to meet your specific requirements and provide a unique user experience. Through the use of hooks and filters, you can seamlessly integrate your custom code into the WordPress ecosystem, expanding the capabilities of your plugin and enhancing its value.
Implementing Plugin Options and Settings
Implementing WordPress plugin options and settings is a crucial aspect of plugin development as it allows users to customize and configure the behavior of the plugin according to their specific needs. By providing an intuitive and flexible settings interface, you enhance the usability and versatility of your plugin. Here’s a step-by-step guide to implementing options and settings in your WordPress plugin:
- Define the Plugin Settings: Identify the settings you want to provide to users. Determine the specific configuration parameters that users can modify, such as text inputs, checkboxes, dropdowns, or file uploads. Consider the functionalities and features of your plugin that can be controlled through these settings.
- Create a Settings Page: Create a dedicated settings page within the WordPress admin dashboard for your plugin. This page will serve as the interface for users to access and modify the plugin settings. You can create a new menu item under the “Settings” or “Tools” section, or integrate the settings within an existing menu item if appropriate.
- Register the Settings Page: Use the
add_options_page()oradd_submenu_page()function to register your settings page. These functions allow you to define the menu location, page title, and callback function that generates the content of the settings page. - Add Sections and Fields: Within the callback function of the settings page, create sections and fields to organize and display the settings options. Use the
add_settings_section()function to define sections, and theadd_settings_field()function to add individual fields within those sections. Specify the field type, label, description, and callback function to generate the field HTML. - Save and Retrieve Settings: Implement functionality to save and retrieve the plugin settings. When users update the settings on the settings page, the data needs to be saved in the WordPress database. Use the
register_setting()function to register the settings group and provide a callback function to sanitize and validate the user input. In the callback function, retrieve the values from the form submission and store them using theupdate_option()orupdate_site_option()function. - Render the Settings Page: In the callback function of the settings page, generate the HTML markup for the settings page using the
settings_fields()function to output the nonce and hidden fields for security, and thedo_settings_sections()function to render the defined sections and fields. Customize the appearance and layout of the settings page using HTML, CSS, and JavaScript as needed. - Display and Retrieve Saved Settings: To retrieve and use the saved plugin settings within your plugin code, use the
get_option()orget_site_option()function. Retrieve the saved values by providing the corresponding option name. You can access the retrieved settings and use them in your plugin’s logic and functionality. - Validate and Sanitize User Input: Ensure that the user input is validated and sanitized before saving it as settings. Implement appropriate validation and sanitization functions to check for data integrity and security. WordPress provides various sanitization functions such as
sanitize_text_field(),absint(), oresc_url()for different data types. - Provide Default Values: Consider setting default values for the plugin settings to provide a fallback in case users haven’t explicitly configured the settings. This ensures that the plugin functions correctly even without custom settings.
- Test and Iterate: Thoroughly test your plugin settings functionality, including saving, retrieving, and applying the settings within your plugin’s features. Test different scenarios and configurations to ensure stability and compatibility with various WordPress environments.
By implementing options and settings in your WordPress plugin, you empower users to tailor the behavior of the plugin to their preferences and requirements. Providing a flexible and user-friendly settings interface enhances the usability and value of your plugin, making it a more versatile tool for WordPress users.
Testing and Debugging the Plugin
Testing and debugging are crucial steps in the development of a WordPress plugin to ensure its stability, reliability, and compatibility with different environments. Thorough testing and effective debugging practices help identify and resolve issues, ensuring a smooth user experience. Here’s a guide on testing and debugging your WordPress plugin:
- Test in Various Environments: Test your plugin in different environments to ensure compatibility. This includes testing on different versions of WordPress, various web browsers, and different operating systems. It’s important to verify that your plugin functions correctly and consistently across these environments.
- Unit Testing: Implement unit tests to verify the functionality of individual components or functions within your plugin. Unit tests help ensure that each part of your codebase performs as expected. Use testing frameworks like PHPUnit or WP_UnitTestCase for writing and running unit tests in WordPress.
- Integration Testing: Perform integration testing to check how well your plugin interacts with other plugins, themes, and core WordPress functionalities. Test common integration scenarios to identify any conflicts or compatibility issues. For example, test your plugin with popular themes or other popular plugins that users might commonly have installed.
- User Interface Testing: Test the user interface of your plugin thoroughly to ensure it functions correctly and provides a seamless experience. Verify that all user inputs and interactions produce the desired outcomes. Test different scenarios and edge cases to catch any UI-related bugs or inconsistencies.
- Automated Testing: Consider setting up automated testing processes to streamline your testing efforts. Utilize tools like continuous integration (CI) services or test frameworks to automate the execution of tests on different environments. Automated testing helps catch regressions quickly and ensures consistent testing across different iterations of your plugin.
- Error Handling and Logging: Implement error handling and logging mechanisms in your plugin to capture and track errors that may occur during runtime. Use functions like
error_log()or WordPress debugging tools (WP_DEBUG,WP_DEBUG_LOG, andWP_DEBUG_DISPLAY) to capture and log errors for debugging purposes. These logs can provide valuable information when troubleshooting issues reported by users. - Debugging Tools and Techniques: Use debugging tools and techniques to identify and fix issues in your plugin. WordPress provides several built-in debugging tools like the Query Monitor plugin, Debug Bar, or the WP_DEBUG constant. Utilize these tools to track PHP errors, monitor database queries, inspect variables, and identify performance bottlenecks.
- Reproduce and Isolate Bugs: When users report bugs or issues, strive to reproduce them in a controlled environment. Create a test scenario that replicates the reported problem to understand the underlying cause. Isolate the issue by disabling other plugins or themes temporarily, and narrow down the problematic code or configuration.
- Fixing Bugs and Issues: Once you have identified the root cause of a bug or issue, apply the necessary fixes. Update your codebase, modify configurations, or address compatibility concerns as required. Make sure to test the fixes thoroughly to ensure they resolve the reported issues effectively.
- Documentation: Document your testing and debugging procedures, including the steps taken, test cases executed, and the resolutions applied to bugs and issues. Maintaining comprehensive documentation helps you and other developers understand the testing and debugging history, facilitating future updates and troubleshooting.
Testing and debugging should be an ongoing process throughout the development lifecycle of your WordPress plugin. Regularly test your plugin with each update, consider user feedback, and promptly address reported issues. By prioritizing testing and employing effective debugging practices, you can ensure that your plugin delivers a robust and reliable experience for WordPress users.
Packaging and Distributing the Plugin
Packaging and distributing your WordPress plugin effectively is crucial to make it accessible to users and ensure its successful deployment. By packaging your plugin appropriately and choosing the right distribution channels, you can reach a wider audience and facilitate easy installation. Here’s a guide on packaging and distributing your WordPress plugin:
- Prepare the Plugin Files: Ensure that your plugin files are organized and ready for packaging. This includes having a main plugin file (typically with a .php extension) that contains the plugin code, as well as any additional files or assets required by your plugin. Remove any unnecessary files or directories that are not directly related to the functionality of your plugin.
- Create a Readme File: Craft a comprehensive readme file that includes essential information about your plugin. This file serves as documentation for users and provides important details such as installation instructions, usage guidelines, supported WordPress versions, changelog, and frequently asked questions (FAQs). Make sure to adhere to the WordPress readme file standards to ensure consistency.
- Choose a Distribution Platform: Consider the distribution platforms available for WordPress plugins and select the most appropriate one for your needs. The official WordPress Plugin Directory is a popular choice as it provides a centralized location for users to discover and install plugins. Alternatively, you may choose to distribute your plugin through your own website or third-party marketplaces.
- Prepare the Plugin for Distribution: Ensure that your plugin is ready for distribution by following these steps:
- Remove any development-specific code, debugging statements, or sensitive information.
- Update the plugin headers with accurate and relevant information, including the plugin name, version, author, description, and license.
- Check that your plugin adheres to WordPress coding standards and best practices.
- Consider internationalization by using translation functions for strings in your plugin to make it easily translatable.
- Create a ZIP Archive: Create a compressed ZIP archive of your plugin files. Include the main plugin file, any additional files or directories, and the readme file. Make sure the ZIP file maintains the appropriate directory structure so that it can be easily installed in WordPress.
- Submit to the WordPress Plugin Directory: If you choose to distribute your plugin through the official WordPress Plugin Directory, follow the submission guidelines provided on their website. This typically involves creating an account, providing detailed information about your plugin, and uploading the ZIP archive. The Plugin Directory team will review your submission before making it publicly available.
- Distribute through Your Website: If you prefer to distribute your plugin through your own website, create a dedicated page or section where users can find and download the plugin. Provide clear instructions for installation and usage, along with the download link to the ZIP archive. You may also consider offering documentation, support forums, or premium versions of your plugin if applicable.
- Consider Third-Party Marketplaces: Explore the option of distributing your plugin through third-party marketplaces or plugin marketplaces that specialize in WordPress products. These platforms provide additional exposure and may attract users who are actively seeking new plugins or specific functionalities. Research and evaluate different marketplaces to find the ones that align with your plugin’s target audience and goals.
- Maintain and Update Your Plugin: Regularly update your plugin to introduce new features, fix bugs, and address security vulnerabilities. Ensure compatibility with the latest WordPress versions and consider user feedback and feature requests. Keep your plugin documentation up to date and maintain a responsive support system to assist users with any queries or issues they may encounter.
By packaging and distributing your WordPress plugin effectively, you increase its visibility and accessibility to users. Whether through the official WordPress Plugin Directory, your own website, or third-party marketplaces, a well-packaged and properly documented plugin increases its chances of reaching a wider audience and being successfully deployed on WordPress sites.
Conclusion
Creating a basic WordPress plugin opens up a world of possibilities for customizing and extending the functionality of a WordPress website. Throughout the process, we’ve covered the essential steps involved in creating a WordPress plugin, including defining the plugin header, implementing activation and deactivation hooks, adding custom functionality, and incorporating options and settings.
By harnessing the power of WordPress hooks and filters, we can seamlessly integrate our custom code into the WordPress ecosystem, ensuring compatibility and providing a smooth user experience. Additionally, by implementing options and settings, we empower users to tailor the plugin to their specific needs and preferences, enhancing its versatility.
Testing and debugging play crucial roles in ensuring the stability and reliability of the plugin. By thoroughly testing in different environments, utilizing unit and integration tests, and employing effective debugging techniques, we can identify and resolve issues, delivering a robust and error-free plugin.
Finally, packaging and distributing the WordPress plugin effectively allows us to make it accessible to a wider audience. Whether through the official WordPress Plugin Directory, our own website, or third-party marketplaces, choosing the right distribution channels and providing comprehensive documentation ensures that users can easily install, use, and benefit from our plugin.
In conclusion, creating a basic WordPress plugin is an exciting endeavor that allows us to tap into the immense flexibility and customization potential of the WordPress platform. By following the steps outlined in this guide and continuously refining our plugin, we can deliver a valuable tool that enhances the functionality and user experience of WordPress websites.
Recent Comments