You took the first step. You set up a store and you feel like a world champion, but the store is empty … and what next? Enter products manually?
Fortunately, there is no need for such thing.
Our guide will guide you step by step through the whole process from logging in as a store administrator to importing products.
Preparation of data in the csv file
To import data to our store quickly and without complications, we need to prepare data about the products that we will enter into the store.
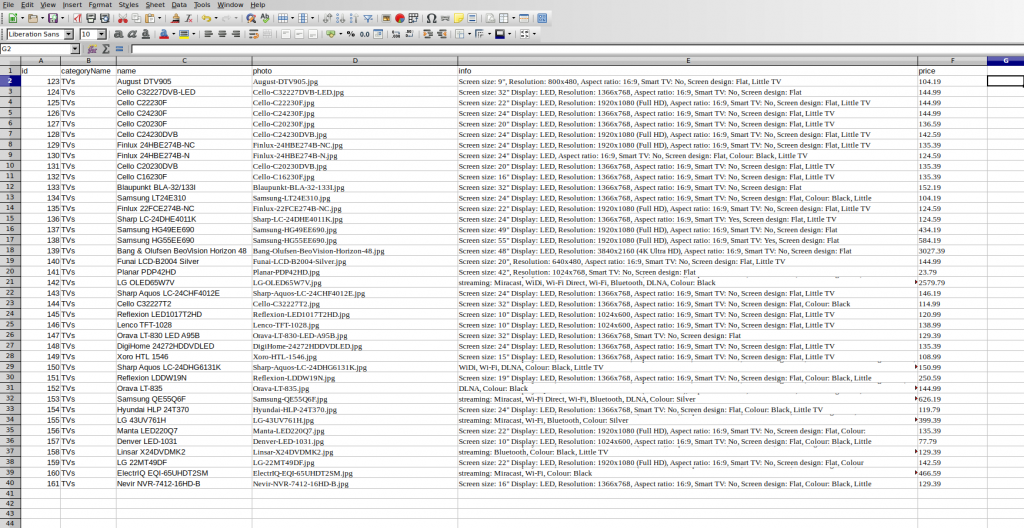
We open a clean .csv sheet and create a data file as in the example below:

Figure 1 shows the completed csv sheet with data for televisions. We have here such data as the product ID (if we use a database, it is worth including such data in the store to always have easy access to the same data in different places), name of the category in which the product will be located, product name, photo address / product photos, description and price. CSV headers don’t matter much. During the import, WooCommerce will ask you to make a map, i.e. to indicate what to import and under what name. We can import a lot of different information. For a full list of data loaded from the csv file, I invite you here.
Logging into the store
To go to the login panel as an administrator, go to the main page of your store, then add the phrase /admin to the address of the store and confirm by pressing “enter”. E.g:
If your store’s website has the address:
The login address for the admin panel is:
http://shop.go4them.co.uk/admin

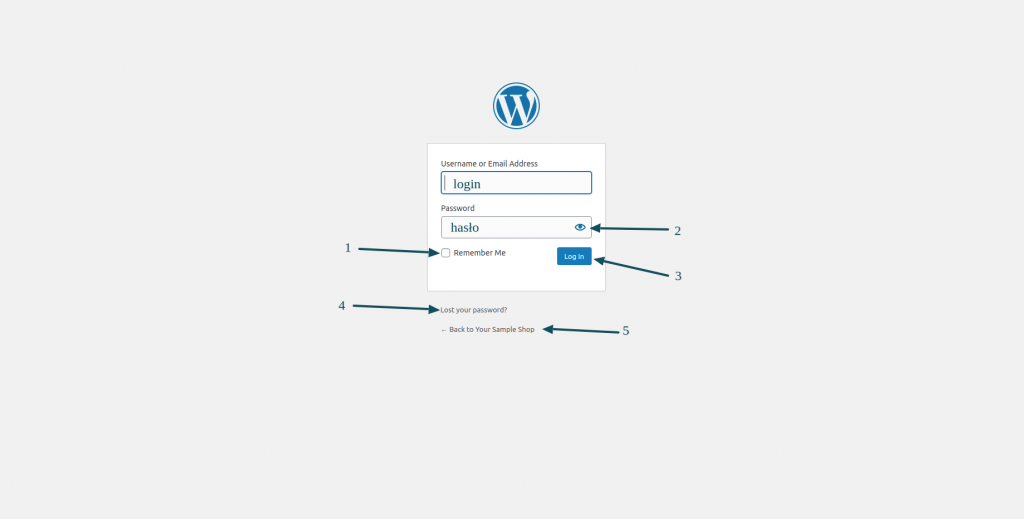
In Figure 2, enter the login details in the places described as the login and password. If we do not want to enter the password every time, when we want to make some changes in our store, we can select the “Remember me” option, which will save our login details in the browser. Number 2 in the figure is a preview of the password entered. Number 3 is the data confirmation button – press after entering your login details. If we have forgotten what password we have, we can go to the password reminder panel by clicking the link marked with number 4. Point 5 is the return to the main page of the store.
Administrator main panel
At first glance, the admin panel may look quite overwhelming, but you don’t need to immediately get a doctorate on all the functionalities available there. At the beginning let’s focus on making our store filled with products.

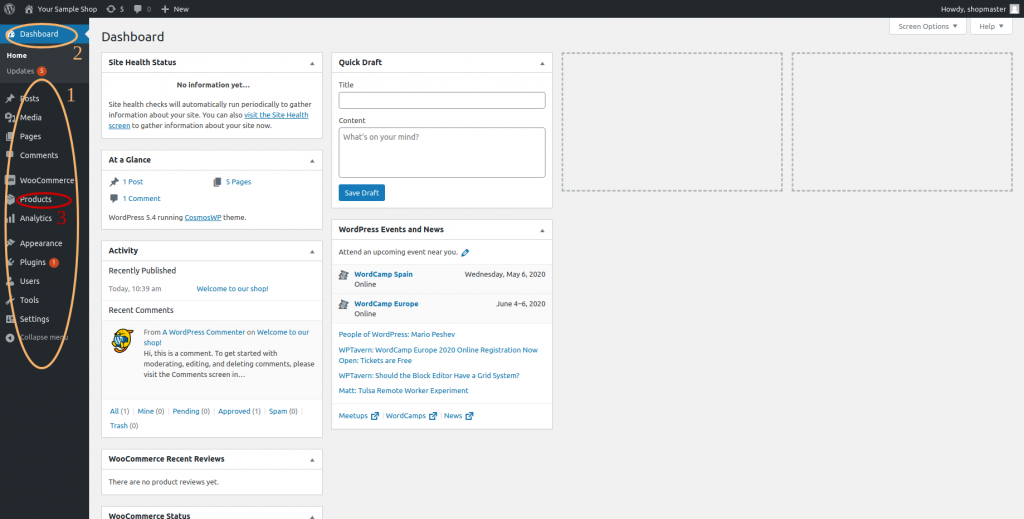
Figure 3 shows the main administrator panel right after logging in. In the foreground are welcome messages from WordPress or its plugins. On the left there is a navigation panel that you will use. Number 1 in the picture is our menu. Number 2 allows you to return to the main panel. Now we will deal with products. Click on the “Products” tab in the menu marked in red with the number 3, and in the next view select the option: “Start import”. “Create product” button. It is used for manual data entry.
Selecting a data file
We begin importing our products’ data. To start with, WooCommerce will ask you to select a file.
The import panel view is presented in figure 4. Point 1 in this figure has been marked with a button that will redirect us to search the file on our disk. After selecting the appropriate file, its name will appear next to it (point 2). To go further, click “Continue” (No. 3). By checking the checkbox marked point 4, we decide only to update the data already entered. If we do not have any products in the store or the products in the selected .csv file do not match the products in the store, WoCommerce will not import any data. Let’s leave this checkbox unchecked if we want to enter new data.
Point 5 in Figure 4 is an advanced import function. There, we can enter the path of the csv file located on the server, change the file delimiter (character that specifies the end of the cell in the file) and order the use of csv-WoCommerce mapping in accordance with the previous import. However, because this is our first import, after moving to the next window by clicking the “Continue” button we will just go to mapping data from csv to our store.
Creating a data map
The column map of the csv file for product fields in the store is used to ensure that the appropriate values from the read file are in the right place in the product description.
Figure 5 shows the field mapping screen, where point 1 marks the columns from the csv file, while point 2 marks the product fields. Product description fields are drop-down lists, where you can also find other advanced fields such as product attributes or tags, but here we will deal with the main topic. For more information I invite you to the WooCommerce documentation. After setting the column and field map, we start importing by clicking “Run the importer”.
Data Import
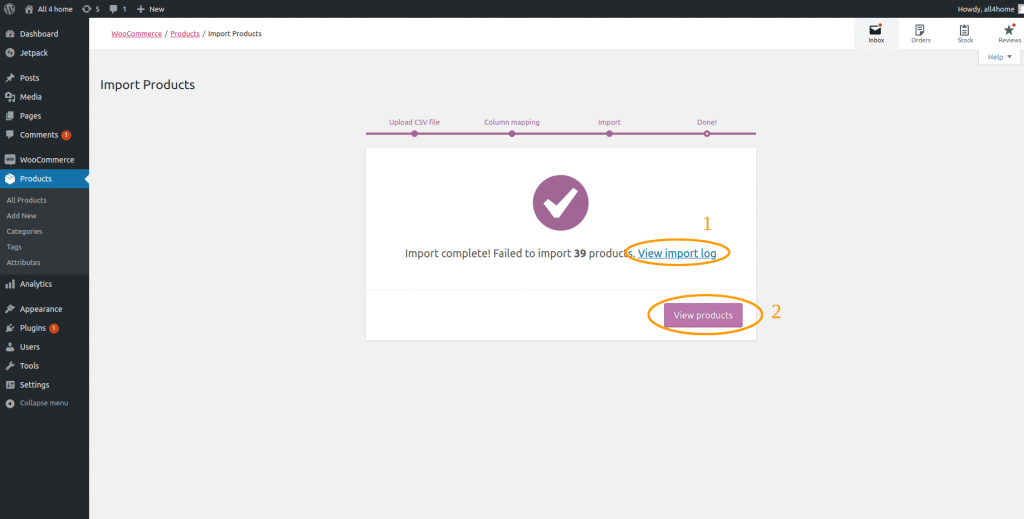
After clicking “Run the importer” WooCommerce will try to import products from the specified csv file. It may take up to several minutes depending on the file size. After the operation, we get information on how our import went, First of all, the number of imported products, the number of omitted products (if a product with a given ID or SKU is already in the database) and the number of unimported products (failed – products with some error in import). Details of the import can be found in the import log (“View import log” point 1 fig. 6). Imported products can be checked by clicking “View products” item 2 fig. 6.

Recent Comments