In this tutorial we will discuss the advantages of using SSL on your WordPress or WooCommerce page and you will find out how to make your WordPress site more secure thanks to https encryption.
Why you should use SSL in your WooCommerce shop on other WordPress site?
If you have access to your httpd server configuration you will be able to install SSL certificate on it. It is great for your SEO and the security of your visitors. Websites protected by HTTPS protocol are almost impossible to eavesdrop and intercept data.
The reason why you should install SSL certificate for your website is because SSL certificate can be used to prevent hackers from gaining access to any of your private information.
This is the basic and most important thing that you can do to protect your e-commerce business on the net.
How to obtain SSL certificate for WordPress site
To run an SSL certificate on your WordPress site in a Commerce-based online store, you must first purchase an SSL certificate from an authorization center.
Most hosting companies broker the purchase of certificates and help with their installation.
You can also get certified for free – for 90 days – thanks to a non-commercial project called LetsEncrypt.
In next part we will get you though three -step process that is essential to secure your WordPress website.
Step 1. Purchase or free acquisition of a certificate for an internet domain.
The first step to securing your virtual property is purchasing an SSL certificate or obtaining it from a non-profit provider.
Importantly, an SSL certificate is purchased or generated for a specific internet domain and not for a specific hosting, online store or WordPress system. It could be moved from one Internet hosting to another as domain URL remains the same.
Please be aware that if you change the domain (URL address) of your website you need to buy another certificate for this new domain.
How SSL Certificates are sold?
Commercially SSL certificates are usually sold on an annual or biennial basis. This means that for one year or two years the authorization center (Certificate Authority) recognizes our website as trustworthy and an encrypted connection on such a website is possible.
Due to the fact that Internet browsers on computers and smartphones trust the Certificate Authority (CA), they do not report problems with securing your connection from browser to website.
Figuratively, the CA stands guard over your site and certifies with the certificate print that this site is trusted and no one is impersonating the entity that purchased the certificate.
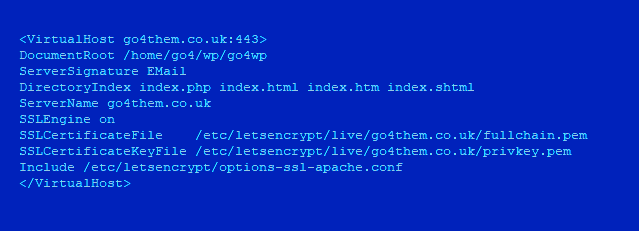
Stage 2. Installation of the certificate on the server – binding the certificate to the Virtual Host (VHOST)
The next stage after purchasing an SSL certificate is its installation on a web server, depending on whether we have hosting on a dedicated server or on a shared hosting or VPS We have various web servers, for example:
- Apache web server
- Nginx
- LiteSpeed Web Server (LSWS)
The certificate is a certain string of characters in the private and public key architecture (RSA), its installation consists in specifying the access path to 3 files on the web server.
These files are:
- private key file – usually named private.key
- certificate file (public key) – usually named cert.crt
- intermediate CA files – usually named ca.crt
Alternatively there are also other format for storing SSL Cert files like PEM files.
All three files must be placed on the server where your WordPress website is located and then the paths to these files must be specified in the server configuration. For the most popular Apache the the following VirtualHost directive must be added to httpd.conf file which is usually located at /etc/apache2 patch (on Linux/Unix OS)
It is also worth mentioning that the standard TCP port for HTTP is 80 while for HTTPS it is 443 TCP (Secure Socket Layer)
To ensure that SSL for WordPress works properly, you must open port 443 TCP in your firewall
Self-installation of an SSL certificate on a web server can be a bit troublesome because it requires a bit of Technical Knowledge – ecpecialy in the field on Linux/Unix operating system and Apache Web server administration.
Nevertheless, most hosting companies offer automatic scripts for installation or provide assistance in this matter.
Remember that is you own dedicated server or Virtual Private server – and you don’t have an additional manage service purchased – you need to install SSL certificate by your own.
You know the SSL certificate is already installed and connected to the domain that is on the casting, so entering the address from https in front opens our store, we still have to configure the WordPress site so that it always works on the SSL certificate, i.e. on a secure connection (HTTPS)
Stage 3. Verifying the installation and configuring WordPress for forced operation with HTTPS
How to make sure that my SSL installation for WordPress is success?
When our SSL certificate is already installed on webserver and connected to the domain that is on the hosting (vhost), you can perform simple check:
Entering the address with https in front of our domain and make sure that it opens your site or store correctly, without warnings or error.
After it – you are sure that SSL instalation on the server is done.
How to setup WordPress to work in SSL mode?
We still have to configure the WordPress website so that it always works on with the SSL certificate – on a secure connection ( HTTPS)
This step is very important because it is crucial from the point of view of optimizing our website in search engines (SEO)
To switch your WordPress site into SSL mode please go to:
WP-admin -> Settings -> General
and change two parameters
- WordPress Address (URL)
- Site Address (URL)
Both of them shound start from https:
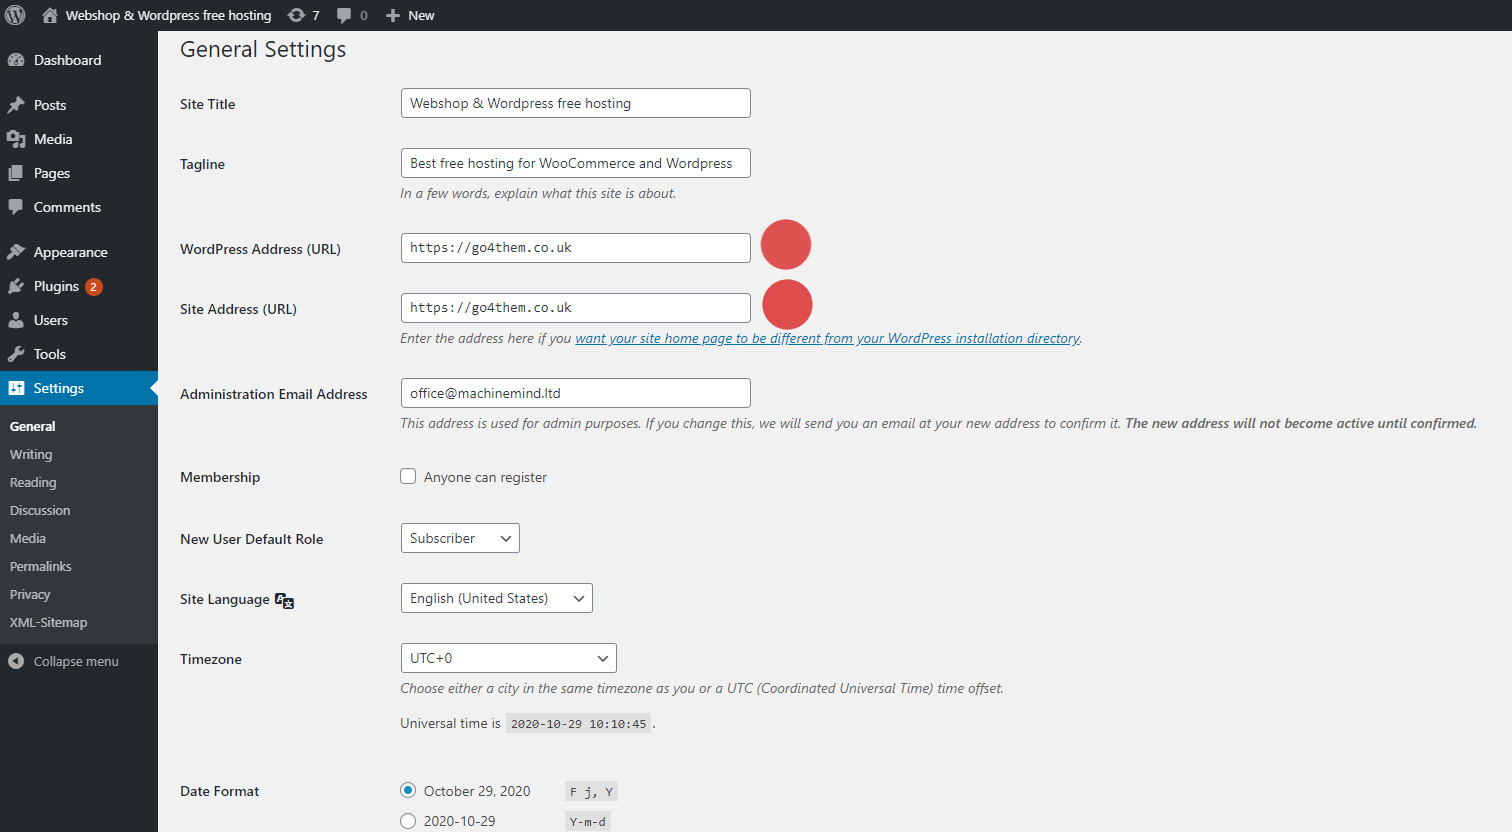
Warning: Please be careful that you only implement the above change after verifying that HTTPS works well for your site, otherwise your website and admin panel may stop working and database changes will be required to fix this
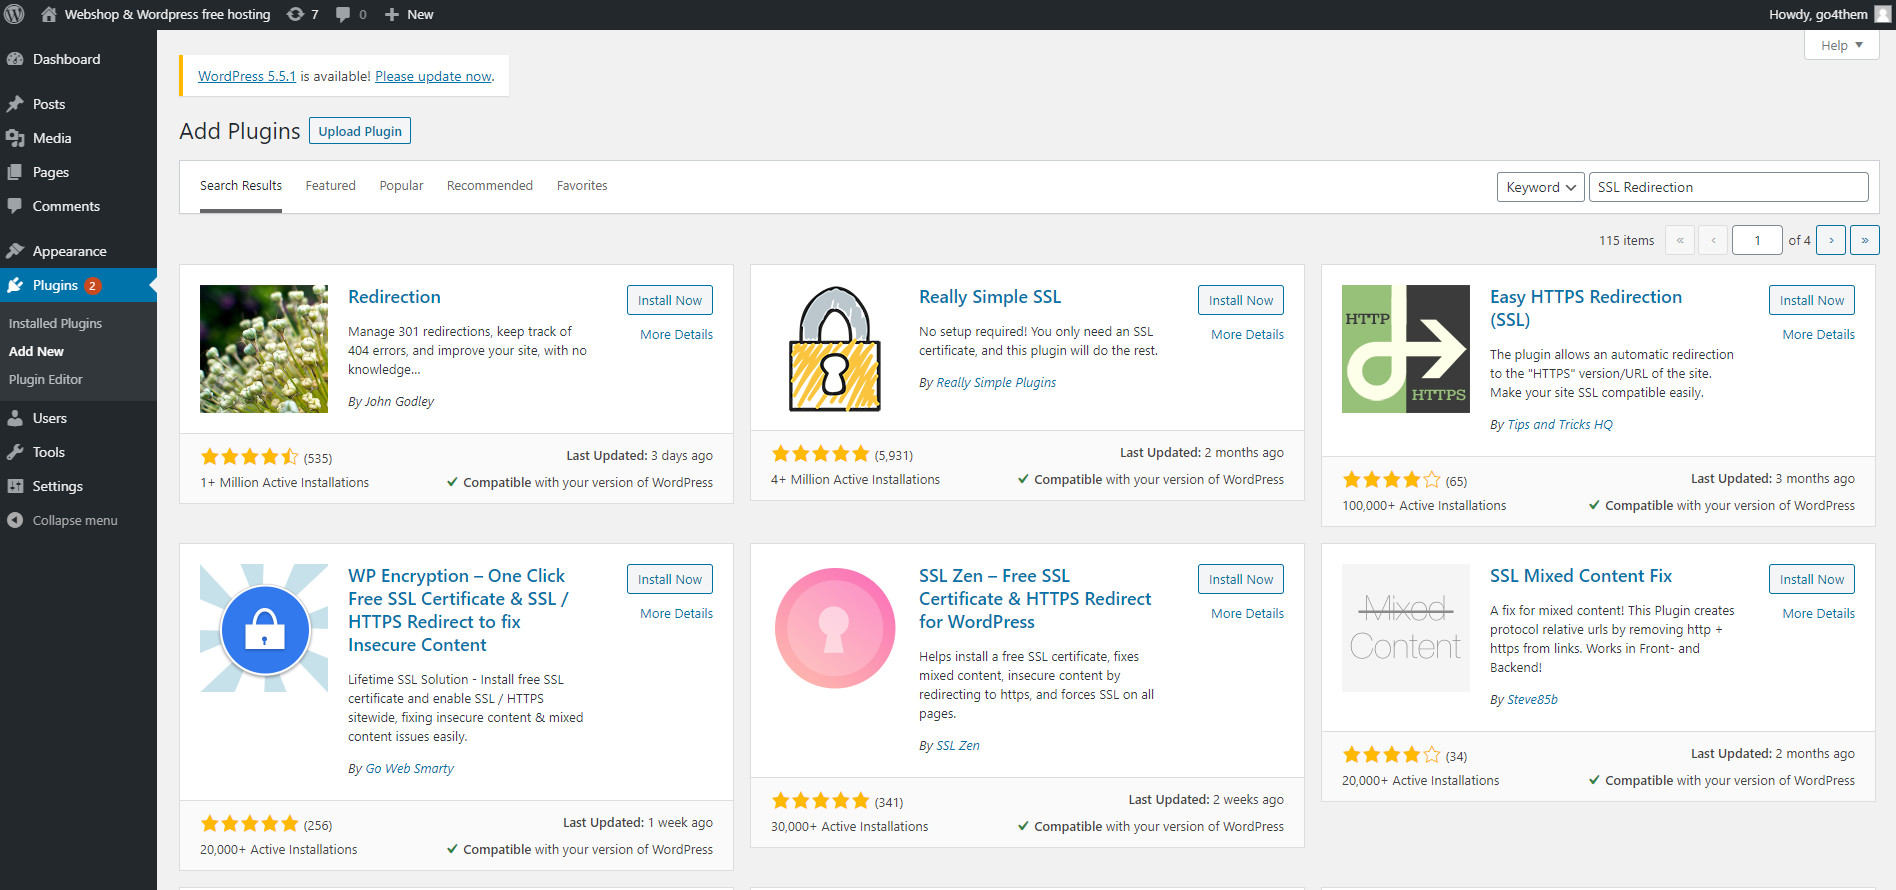
When we turn on the encrypted SSL connection on each of the subpages – we additionally need to take care to force the redirection of HTTP traffic to HTTPS.
Thanks to this step – we we protect ourselves against errors reported by browsers and the so-called Mixed content warnings.
How to fix Mixed-content warning in WordPress and WooCommerce ?
The problem is that if your woo site was previously run without SSL – using the standard http protocol – then there will be references to images, CSS style files based on http in your post, pages and comments.
It is very important to massively change all internal links from http to https.
How to easily update all content on wordpres to relate to HTTPS addresses inside our site.
To massively update all pages and comments on your site, you must run the SQL command at the MySQL database level.
Additionally, you should use a plugin or htacces command that will force a redirect with the http 301 header code.
Recent Comments